Since MediaMaster 1.1 we have revamped our video engine and particularly the synchronization and multi threading.
We now perform what can be called software genlock to ensure the best possible fluidity if your machine has a multi core processor. Genock is the action of locking the frequency of a media on a reference signal or clock. There is a nice description on that on wikipedia.
When the software must present a frame you can cut the work that has to be done in 3 parts : getting the video frames from the disk, uploading them to the graphic card and doing the composition / blending of the pixels for the presentation.
Because of the way disks are working and because the time that is required by a codec to convert the data from the disk into a decompressed frame is not constant this can create fluidity problems.
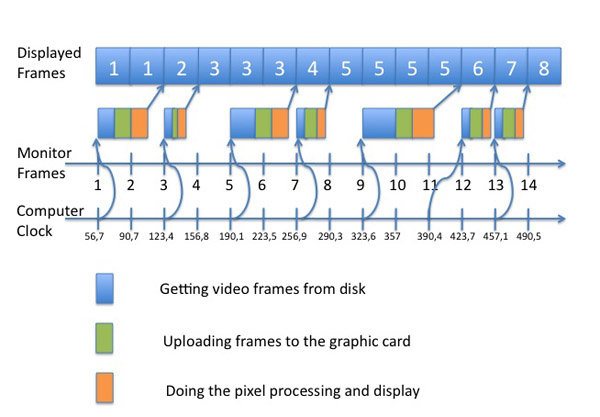
So at each new frame the software wakes up and start working sequentially on the 3 phases. In a classical real-time video processing application this will work like this:

Traditional video application
This graph show an application trying to play a video loop encoded at 30 fps on a monitor running at 60 fps. In a perfect world the application should present each frames of the movie exactly twice.
There are 2 problems with the traditional way of doing the video processing:
The processing done by MediaMaster is much more elegant. Since 1.1 we have 3 modes, the original one, a buffered mode and a frame blending mode.
In this article I focus on the buffered mode, I will write more about frame blending latter.
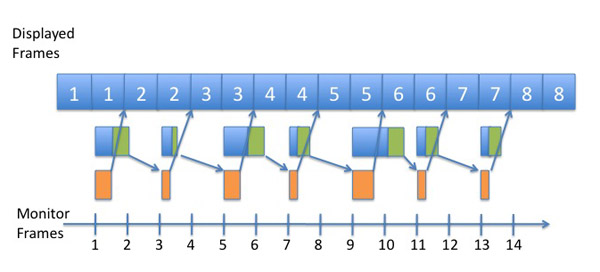
So in buffered mode the graphic card has always one frame in advance ready to be composed. As soon as a frame has been processed and presented to the user the software read and upload the next video frame in advance.
The other thing that is done in buffered mode is that the clock of the content is not taken anymore from the computer clock but rather from the monitor frequency. To my knowledge most other media players are not doing something as subtle as this.
So if we keep the same timings as in the first example but simply shuffle them according to the way the buffered mode is working here is the result:

Software genlocked video
Because the movie clock is genlocked to the monitor and because we have always one frame in advance we play the movie with a perfect regularity and timing : 1 1 2 2 3 3 4 4 … each frame is played exactly twice.
If you are still not too sure why it’s nice to be genlocked at 60 fps here is a recording we did in real time from MediaMaster when running 2 layers. The lower one is at 30 fps and the top one is at 60 fps. The loop running at 60 fps is part of our test content, it’s a loop running a ramp that allows us to see visually if the system is perfectly genlocked. we capture the output with fraps.
If you apply effects to the content you play, the effects will be rendered at 60 fps and this is why it’s so important to have a perfect synchronization, your eyes will have the feeling that everything is crisp and fluid.
In order to see the videos in this article you need to have QuickTime installed and the first video should play smooth on a recent laptop or on a LCD monitor set at 60 fps.
So here is the original screen grab that I just scalled down in order to show it in this article, the fps is still 60 fps:
Now in order for you to be able to see the difference here is the same loop at 30 fps:
I continue to lower down the fps and now we are at 20 fps:
Here is the more degraded version at 15 fps:
If you are curious to test this with any software video mixer that can play QuickTime movies here are our test files:
Horizontal ramp, 2 seconds at 60 fps:
Here is a vertical ramp at 60 fps:
And a zooming rectangle at 60 fps:
Those movies can be downloaded for you to test your systems, you just need a software that support QuickTime *.mov files. For best results you should loop those files and let them run for a while. In a VJ application you can simply add them as the latest layer of your composition with an addition blending and you will see if your system is powerful enough and well designed.
Feel free to stress test our software and compare it with others, we think that we did very nice with MediaMaster and there is a demo version for you to test on the ArKaos web site.

